User Guide
ONIE supports a number of methods for locating a Network Operating System (NOS) installer image. The methods range from really easy to rather complex.
The easy methods are suitable for installing an NOS on a small number of switches as a proof of concept or for a demo. These methods, while easy to set up, offer limited configurable options that more complex networks may require.
The more complex methods are suitable for complex networks and large scale switch deployment scenarios. These methods offer a wide range of flexible options, with the downside being you need to understand and configure these options.
Note
The examples throughout this section reference a hypothetical PowerPC-based switch, called MACHINE, manufactured by a hypothetical hardware manufacturer, called VENDOR.
Installing using a USB thumb drive
To install via USB simply copy the installer image to the root
directory of the USB thumb drive, using the file name
onie-installer.
For the purposes of this guide, assume the the NOS installer image is
named ACME_XYZ1234_PowerPC_Installer.bin. Let’s assume the USB
drive shows up at /dev/sdd1 under Linux (it might be different on your
system and OS).
Copy the installer file to the root of the USB thumb drive like this:
linux:~$ sudo mkdir /mnt/usb
linux:~$ sudo mount /dev/sdd1 /mnt/usb
linux:~$ sudo cp ACME_XYZ1234_PowerPC_Installer.bin /mnt/usb/onie-installer
linux:~$ sudo umount /mnt/usb
Now remove the USB drive from your computer and insert it into the USB
port on the front (or rear) panel of your ONIE enabled device. Power
on the device and ONIE will discover the onie-installer file on
the root of the USB drive and execute it.
Installing over the Network
For all network installation scenarios, ONIE expects the NOS installer image to be available on the network via HTTP. This guide assumes the following hostname and IPv4 address of the Web server:
hostname:  image-server
IP addr :  203.0.113.10
Before continuing, the following resources must be set up:
- Install and configure an HTTP server.
- Copy the NOS installer image to the HTTP server.
Installing and Configuring the HTTP Server
Download and install your favorite HTTP server [3] [4].
The examples in this guide assume Apache httpd is installed on a Linux
machine with the default configuration options. The document root of
the Web server is /var/www.
Copying the NOS Installer Image to the HTTP Server
After procuring your NOS installer image from your NOS vendor, copy the
installer to the document root of your Web server. In the case of
Apache on Linux, the document root directory is /var/www. You
probably need root privileges to copy files there.
For the purposes of this guide, assume the the NOS installer image is
named ACME_XYZ1234_PowerPC_Installer.bin. After copying this file
to the document root of the Web server, the contents of /var/www
should look like this:
image-server:~$ sudo cp ACME_XYZ1234_PowerPC_Installer.bin /var/www
image-server:~$ ls -l /var/www
-rw-r--r-- 1 root root  17755 Jun 27 16:18 ACME_XYZ1234_PowerPC_Installer.bin
Testing the NOS Installer Download from the HTTP Server
Before proceeding, it is a good idea to double check the configuration
of the Web server and the location of the NOS installer image. From
another machine, try to download the NOS installer image. You could
use a Web browser or a CLI command like wget ([5]) or curl
([6]).
The URLs to double check are:
http://203.0.113.10/ACME_XYZ1234_PowerPC_Installer.bin
http://image-server/ACME_XYZ1234_PowerPC_Installer.bin
Directly Connected Scenario
The most simple topology is when the Web server is directly connected to the Ethernet management port on the target switch, as depicted in the following diagram.

Switch and Web Server Directly Connected
This simple configuration is appropriate for provisioning a small number of switches without relying on a lot of infrastructure. You might have this scenario in a production environment when you wheel a crash cart up to a switch in a rack and need to perform a quick one-off install.
In this scenario, without any additional configuration, ONIE will discover the IP address (either IPv6 or IPv4) of the link local Web server. See the HTTP IPv4 and IPv6 Neighbors section for more on how ONIE discovers its link local neighbors.
After neighbor discovery, ONIE makes HTTP requests for a series of default installer image file names as described in Default File Name Search Order.
Next, ONIE applies the default file name conventions, then it makes the following HTTP requests looking for an installer image:
http://203.0.113.10/onie-installer-powerpc-VENDOR_MACHINE-r0
http://203.0.113.10/onie-installer-powerpc-VENDOR_MACHINE
http://203.0.113.10/onie-installer-VENDOR_MACHINE
http://203.0.113.10/onie-installer-powerpc
http://203.0.113.10/onie-installer
Note
For the exact file names used for your specific hardware platform please contact your NOS vendor or your hardware vendor.
A simple way to configure the Web server is to symlink (or rename) the NOS vendor’s image name to one of the default ONIE installer file names. The symlink technique is shown here:
image-server:~$ cd /var/www
image-server:/var/www$ sudo ln -s ACME_XYZ1234_PowerPC_Installer.bin ./onie-installer
image-server:/var/www$ ls -l
lrwxrwxrwx 1 root root  104 Jul 22 14:01 onie-installer -> ACME_XYZ1234_PowerPC_Installer.bin
With the symlink in place, the Web server hands back the full
installer image in response to the request for onie-installer.
Now ONIE can download and run the installer image.
L2 Connected Scenario
In this topology, the target switch and the Web server are both in the same layer 2 network. For example, they might both be plugged into the same unmanaged switch. This is depicted in the following diagram.
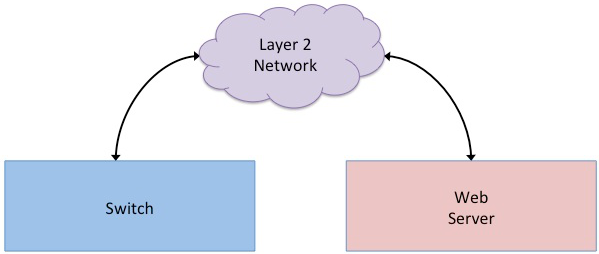
Switch and Web Server on Same L2 Network
This scenario proceeds just like the Directly Connected Scenario described previously. ONIE discovers the IP address of the Web server and tries to download a series of default file names from the server.
Basic DHCP Scenario 1 (Specify Installer Image URL)
In this scenario we jump up one level in sophistication and use a DHCP server to provide more specific information about the location of the installer image. The DHCP server, target switch and Web server are all located on the same layer 2 network. This is depicted in the following diagram.
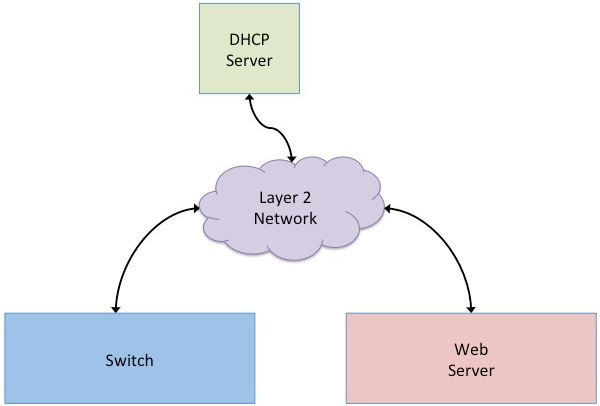
Switch and Web Server on Same L2 Network with DHCP Server
The DHCP server provides the following information:
- IP address for the target switch from a pool of IP addresses
- URL of the installer image on the Web server
Below is a sample from a dhcpd.conf file for an ISC DHCP server
[1] [2]. For more information on how ONIE
uses DHCP options, see the DHCP Requests and Responses section:
subnet 203.0.113.0 netmask 255.255.255.0 {
  range 203.0.113.20 203.0.113.200;
  option default-url = "http://203.0.113.10/customer-abc-onie-installer";
}
With this configuration ONIE picks up an IP address from the pool
defined by the range parameter. ONIE next attempts to download
the URL specified by the default-url parameter.
With this technique you can:
- Assign whatever IP addresses make sense for your network.
- Name the installer image whatever you want, including sub-directories.
Note
In this example the Web server and target switch must be on the same layer 2 network.
Basic DHCP Scenario 2 (Domain Name Server)
This scenario is just like Basic DHCP Scenario 1 (Specify Installer Image URL) with the addition of a domain name server (DNS). By introducing a domain name server you can use logical names for the Web server, without using hard-coded IP addresses.
To add support for DNS, specify the domain-name-servers DHCP
option in the dhcpd.conf file:
subnet 203.0.113.0 netmask 255.255.255.0 {
  range 203.0.113.20 203.0.113.200;
  option domain-name-servers 203.0.113.2;
  option default-url = "http://image-server/customer-abc-onie-installer";
}
The domain name server is 203.0.113.2. ONIE uses this server to
resolve the IP address for the hostname image-server.
Layer 3 Network Scenario
This scenario picks up where the Basic DHCP Scenario 2 (Domain Name Server) left off and adds router information to the DHCP configuration. In this scenario the target switch traverses a layer 3 network via a gateway to reach the Web server. The network topology is shown in the following diagram.
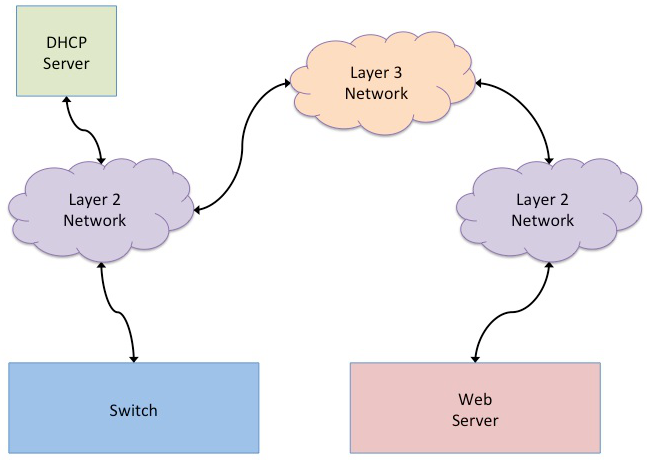
Switch and Web Server on Different L3 Networks with DHCP Server
With this setup, the Web server and target switch can reside on different subnets. The target switch needs to send packets via a router to reach the Web server, since the machines are on different subnets.
To specify a router for the target switch, in the DHCP configuration, set
the routers option to the IP address of the router:
subnet 203.0.113.0 netmask 255.255.255.0 {
  range 203.0.113.20 203.0.113.200;
  option domain-name-servers 203.0.113.2;
  option routers 203.0.113.3;
  option default-url = "http://image-server/customer-abc-onie-installer";
}
When requesting the installer image, the target switch sends packets to 203.0.113.3, which then forwards the packets to the next hop in the layer 3 network. Ultimately the packets reach the Web server and it replies with the installer image.
Note
For this scenario, the DHCP server must be in the same layer 2 network as the target switch. The Web server is free to reside in any subnet reachable by the router.
Note
You can use BOOTP relay agents [9] to locate your DHCP server on a different layer 2 network. Configuration of BOOTP realy agents is beyond the scope of this document.
Advanced DHCP (Match Vendor Class Identifier)
When ONIE makes a DHCP request, it sets the DHCP vendor class (option 60) to a particular string. See Vendor Class Identifier – Option 60 for more on how the DHCP vendor class is set. Using our example PowerPC machine, the string would be:
onie_vendor:powerpc-VENDOR_MACHINE-r0
Note
For the exact DHCP Vendor Class Identifier used for your specific hardware platform please contact your NOS vendor or your hardware vendor.
The ISC DHCP server configuration file syntax contains basic string
matching functionality that we can use to identify ONIE DHCP requests.
By parsing this string, an appropriate image URL can be returned by the
default-url DHCP option [7] [8].
The following DHCP stanzas differentiate between PowerPC ONIE-enabled switches from example vendors VendorX and VendorY:
class "onie-vendor-X-class" {
  match if substring(option vendor-class-identifier, 0, 27) = "onie_vendor:powerpc-VendorX";
  option default-url = "http://image-server/VendorX-onie-installer";
}

class "onie-vendor-Y-class" {
  match if substring(option vendor-class-identifier, 0, 27) = "onie_vendor:powerpc-VendorY";
  option default-url = "http://image-server/VendorY-onie-installer";
}
In this case the DHCP server hands back different URLs depending on
the vendor-class-identifier option.
Note
When debugging such constructs you may find it useful to
sprinkle in some DHCP logging directives. For example, the
following log() directive placed outside the class stanza
can help you understand what is going on:
log(error, concat("vendor-class: ", substring(option vendor-class-identifier, 0, 11)));
log(error, concat("platform    : ", substring(option vendor-class-identifier, 12, 999)));
The first log() displays the first 11 characters of the
vendor-class-identifier, which should be the string
onie_vendor. The 2nd log() displays the remaining
characters.
Once everything is working you can remove the logging.
Advanced DHCP 2 (VIVSO)
As an alternative to string matching on the vendor-class-identifier,
ONIE also sends a Vendor-Identifying Vendor-Specific Information
Option (VIVSO - DHCP option 125) [8].
The VIVSO method is a more precise method of identifying the target switch, however, this method also requires a bit more configuration on the DHCP server.
For more information on how ONIE uses VIVSO, see Vendor-Identifying Vendor-Specific Information (VIVSO). Read that now if you are interested in using VIVSO. (I mean it, go now; we will wait for you to get back.)
The VIVSO option is bi-directional – the ONIE DHCP client sends the option with identifying fields set and the DHCP server responds with the URL field set.
VIVSO is nothing more than encapsulating vendor specific options inside a standard DHCP option (option 125) [10].
In order for the ISC DHCP server to parse option 125, we have to define the fields and data types to use. Here is a snippet of the ISC DHCP server configuration defining the fields that ONIE uses:
# Create an option namespace called ONIE
option space onie code width 1 length width 1;

# Define the code names and data types within the ONIE namespace
option onie.installer_url code 1 = text;
option onie.updater_url   code 2 = text;
option onie.machine       code 3 = text;
option onie.arch          code 4 = text;
option onie.machine_rev   code 5 = text;

# Package the ONIE namespace into option 125
option space vivso code width 4 length width 1;
option vivso.onie code 42623 = encapsulate onie;
option vivso.iana code 0 = string;
option op125 code 125 = encapsulate vivso;
I told you this method required more configuration…
The number 42623 is a 32-bit IANA Enterprise Number used by ONIE to identify its name space [11]. Since VIVSO allows for multiple sets of vendor specific options, each set of options must be uniquely identified by a IANA enterprise number.
The option space configuration should go into the dhcpd.conf file
at the global level, outside of any class definitions.
Now, with the option space defined, we can use the definitions when receiving a VIVSO option. Here is a snippet using the option space definitions to inspect the target switch architecture and machine type:
class "onie-vendor-classes" {
  # Limit the matching to a request we know originated from ONIE
  match if substring(option vendor-class-identifier, 0, 11) = "onie_vendor";

  # Required to use VIVSO
  option vivso.iana 01:01:01;

  # generic CPU architecture matching
  if option onie.arch = "powerpc" {
    option onie.installer_url = "http://image-server/generic-powerpc-onie-installer";
  }

  # matching on CPU architecture and machine type
  if option onie.arch = "powerpc" and option onie.machine = "XYZ1234" {
    option onie.installer_url = "http://image-server/powerpc-xyz1234-onie-installer";
  }

  # The contents of an option can also be used to create the response text
  if exists onie.arch and exists onie.machine and exists onie.machine_rev {
    option onie.installer_url = concat("http://image-server/image-installer-",
                                     option onie.arch, "-", option onie.machine,
                                     "-r", option onie.machine_rev);
  }

  # When operating in ONIE 'update' mode ONIE will check the
  # onie.updater_url response option
  if option onie.arch = "powerpc" and option onie.machine = "XYZ1234" {
    option onie.updater_url = "http://image-server/onie-updater-VENDOR_XYZ1234-powerpc.bin";
  }

}
Whew! Let’s go through this configuration and discuss what they mean.
First the class definition:
class "onie-vendor-classes" {
  # Limit the matching to a request we know originated from ONIE
  match if substring(option vendor-class-identifier, 0, 11) = "onie_vendor";
The idea here is to limit the subsequent matching to a request we know originated from an ONIE-enabled machine. This is really just a bit of healthy paranoia.
Next, the iana option:
# Required to use VIVSO
option vivso.iana 01:01:01;
This along with the option space vivso defined above is a workaround
to a known issue in ISC DHCP server. Without this workaround, the server
will not send back an option 125 response [12].
Next, the generic CPU architecture matching statement:
# generic CPU architecture matching
if option onie.arch = "powerpc" {
  option onie.installer_url = "http://image-server/generic-powerpc-onie-installer";
}
This is an example of comparing an option field to a string. If the
string matches, then the installer_url in the response is set to the
specified string.
Next, using the request field values in the response field values:
# The contents of an option can also be used to create the response text
if exists onie.arch and exists onie.machine and exists onie.machine_rev {
  option onie.installer_url = concat("http://image-server/image-installer-",
                                   option onie.arch, "-", option onie.machine,
                                   "-r", option onie.machine_rev);
}
Using the function concat you can piece together several strings
to form the fields of the response. Use the option directive to
extract the strings from the request and use the results to create the
response.
For example in the above snippet assume onie.arch = "powerpc",
onie.machine = "XYZ1234" and onie.machine_rev = "2". In this case,
onie.installer_url would be set to:
onie.installer_url = "http://image-server/image-installer-powerpc-XYZ1234-r2"
Finally, let’s look at the updater_url field:
# When operating in ONIE 'update' mode ONIE will check the
# onie.updater_url response option
if option onie.arch = "powerpc" and option onie.machine = "XYZ1234" {
  option onie.updater_url = "http://image-server/onie-updater-VENDOR_XYZ1234-powerpc.bin";
}
ONIE can run in self-update mode where it looks for an ONIE update URL. The update URL is used to download an ONIE self-update binary, which ONIE uses to update itself.
Everything we have discussed about installer image URLs applies to ONIE updater URLs when ONIE runs in self-update mode.
See Updating ONIE for more about ONIE self-update mode.
HTTP Headers and Scripting
When ONIE makes an HTTP request for an image a number of ONIE-specific HTTP headers are sent. The values of these headers could be used in advanced deployments to taylor the provisioning. The following headers are set:
ONIE-SERIAL-NUMBER:
ONIE-ETH-ADDR:
ONIE-VENDOR-ID:
ONIE-MACHINE:
ONIE-MACHINE-REV:
ONIE-ARCH:
ONIE-OPERATION:
See HTTP Requests and HTTP Headers for more about these HTTP headers.
For exmaple, the image URL handed out by the DHPC server could be a
CGI script on the HTTP server. The CGI script could use the headers,
like ONIE-SERIAL-NUMBER and ONIE-ETH-ADDR, to tie the
deployment together with an inventory control database.
Debugging an Installation
If you are having trouble with an ONIE based installation, here are a few suggestions.
Verify Web Server Configuration
Are you able to download the image from the Web server using a Web browser? See Testing the NOS Installer Download from the HTTP Server.
Try Direct Connection
Try connecting the Web server directly to the target switch as described in Directly Connected Scenario.
Inspect DHCP Server Logs
Try adding some logging to your DHCP server configuration as described in Advanced DHCP (Match Vendor Class Identifier).
Also see if you server is handing out leases to the expected MAC addresses.
Use TCPDUMP
If possible use tcpdump to inspect the network traffic on the DHCP
server [13]. If you can gain root access to the DHCP server,
run the following tcpdump command to inspect the network traffic:
dhcp-server:~ # tcpdump -v -e -i <intf> ether host <MAC address>
Replace <intf> with the network interface of the DHCP server that is facing the target switch. For example it might be ‘eth0’ or ‘eth1’.
Replace <MAC address> with the MAC address of the target switch’s Ethernet management port. You should be able to find the MAC address on a label affixed to the outside of the switch.
Simplify DHCP Configuration
Try to trim down your DHCP configuration to the bare minimum. Remember configuration within matching classes supersedes any global scope configuration.
Add a Remote Syslog Server
ONIE can remotely log its progress to a syslog server. If the DHCP
response contains a log-servers option, ONIE will remotely log to
that server. Here is the ISC DHCP server syntax to specify a remote
syslog server:
option log-servers 203.0.113.2;
Log In to the Target Switch
If you can determine that ONIE is getting an IP address from the DHCP
server (look at the DHCP leases file) you can remotely log in to the
target switch using ssh or telnet:
linux:$ ssh root@203.0.113.22
The authenticity of host '203.0.113.22 (203.0.113.22)' can't be established.
RSA key fingerprint is 15:05:64:8a:c6:f3:5f:65:41:a6:10:f6:9d:43:9c:49.
Are you sure you want to continue connecting (yes/no)? yes
Warning: Permanently added '203.0.113.22' (RSA) to the list of known hosts.
ONIE:~ #
ONIE does not require a password for either ssh or telnet. Once
logged in you can inspect the ONIE log file /var/log/onie.log and
see what is happening:
ONIE:~ # cat /var/log/onie.log
Connect to the Serial Console
If all else fails, you can connect to the serial console of the target switch. ONIE uses a baud rate of 115200.
Footnotes
| [1] | ISC DHCP Server |
| [2] | ISC DHCP Server Options |
| [3] | Apache httpd |
| [4] | NGINX HTTP server |
| [5] | wget http download |
| [6] | curl http download |
| [7] | dhcp-eval(5) |
| [8] | (1, 2) dhcp-options(5) |
| [9] | RFC-2131 and BOOTP Relay Agent |
| [10] | RFC-3925 and VIVSO |
| [11] | IANA Enterprise Number |
| [12] | VIVSO work around discussion thread |
| [13] | tcpdump - dump traffic on a network |